Introduction
Installing an eSATA adapter card can greatly enhance your computer’s data transfer capabilities, allowing you to connect external hard drives and other devices via eSATA. This guide will walk you through the necessary steps to install an eSATA adapter card in your PC.
Tools and Materials Needed
- eSATA adapter card
- Philips-head screwdriver
- Antistatic wrist strap
- Computer with an available PCI or PCIe slot
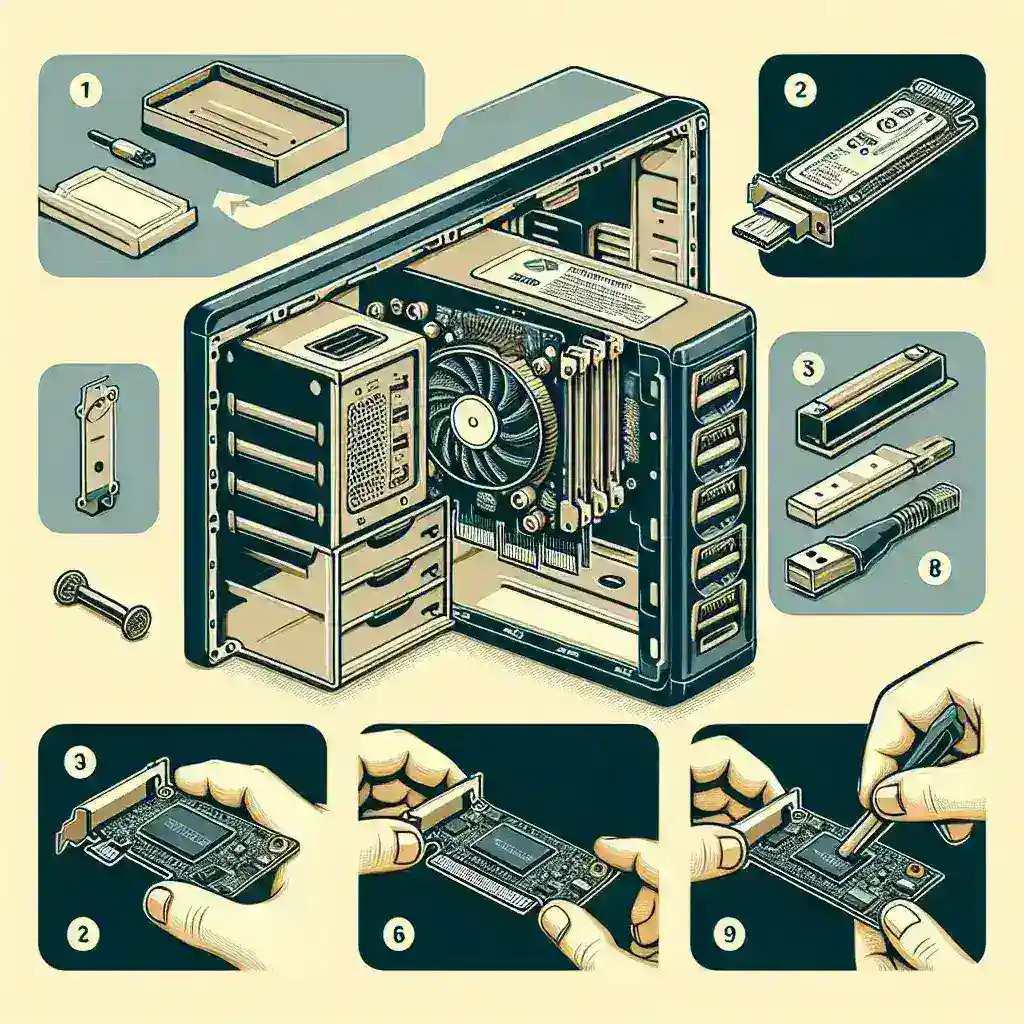
Step-by-Step Installation Guide
Step 1: Prepare Your Work Area
Make sure you have a clean, static-free workspace. Turn off your computer and unplug it from the power source. It’s wise to use an antistatic wrist strap to prevent static electricity from damaging your components.
Step 2: Open the Computer Case
Use a Philips-head screwdriver to remove the screws securing the side panel of your computer case. Slide the panel off and set it aside.
Step 3: Locate an Available Slot
Identify an available PCI or PCIe slot on your motherboard. This is where you will insert the eSATA adapter card. If necessary, remove the metal cover on the back of the case to make room for the card.
Step 4: Insert the eSATA Adapter Card
Carefully align the eSATA adapter card with the chosen slot and press it firmly into place. Ensure it is seated evenly and securely.
Step 5: Secure the Card
Use a screw to secure the eSATA adapter card to the case, ensuring it does not move.
Step 6: Reassemble the Computer
Replace the side panel of your computer case and tighten the screws. Plug your computer back into the power source and turn it on.
Step 7: Install Drivers
Depending on your operating system, your computer may automatically detect the new hardware and install the necessary drivers. If not, insert the driver CD that came with your eSATA adapter and follow the on-screen instructions.
Benefits of Installing an eSATA Adapter Card
- Improved Data Transfer Speeds: eSATA generally offers faster transfer rates compared to USB 2.0.
- Direct Connection: Provides a direct connection to the motherboard, reducing bottlenecks.
- Enhanced Performance: Suitable for tasks that require extensive data transfers like video editing.
Troubleshooting Tips
- Check Connections: Ensure the card is properly seated in the slot and all screws are tight.
- Driver Issues: Verify that the correct drivers are installed. Visit the manufacturer’s website for the latest versions.
- Conflict with Other Devices: Check your Device Manager for any hardware conflicts and resolve them by updating or reinstalling drivers.
Conclusion
Installing an eSATA adapter card is a straightforward task that can greatly improve your computer’s data handling capabilities. By following these steps, you can enjoy faster data transfer speeds, better performance, and a more efficient computing experience.